Materials Spotlight: Montessori Mobiles

Tamara Sevigny • September 12, 2022

In their first weeks of life, babies begin to focus their eyes and track objects. These small acts of visual control provide an important foundation for newborns who are building their neural networks. To set infants up for success, we offer a series of specially designed mobiles to aid this development.


Each Montessori mobile is created with particular characteristics to help babies further develop their sense of sight, depth perception, concentration, hand-eye coordination, and more. Plus, newborns love them!


Essential Characteristics of Montessori Mobiles

Montessori mobiles follow a progression that parallels infant development. The first mobiles have a visual focus and begin with basic shapes. They progress to include more complicated objects and eventually become interactive and tactile.


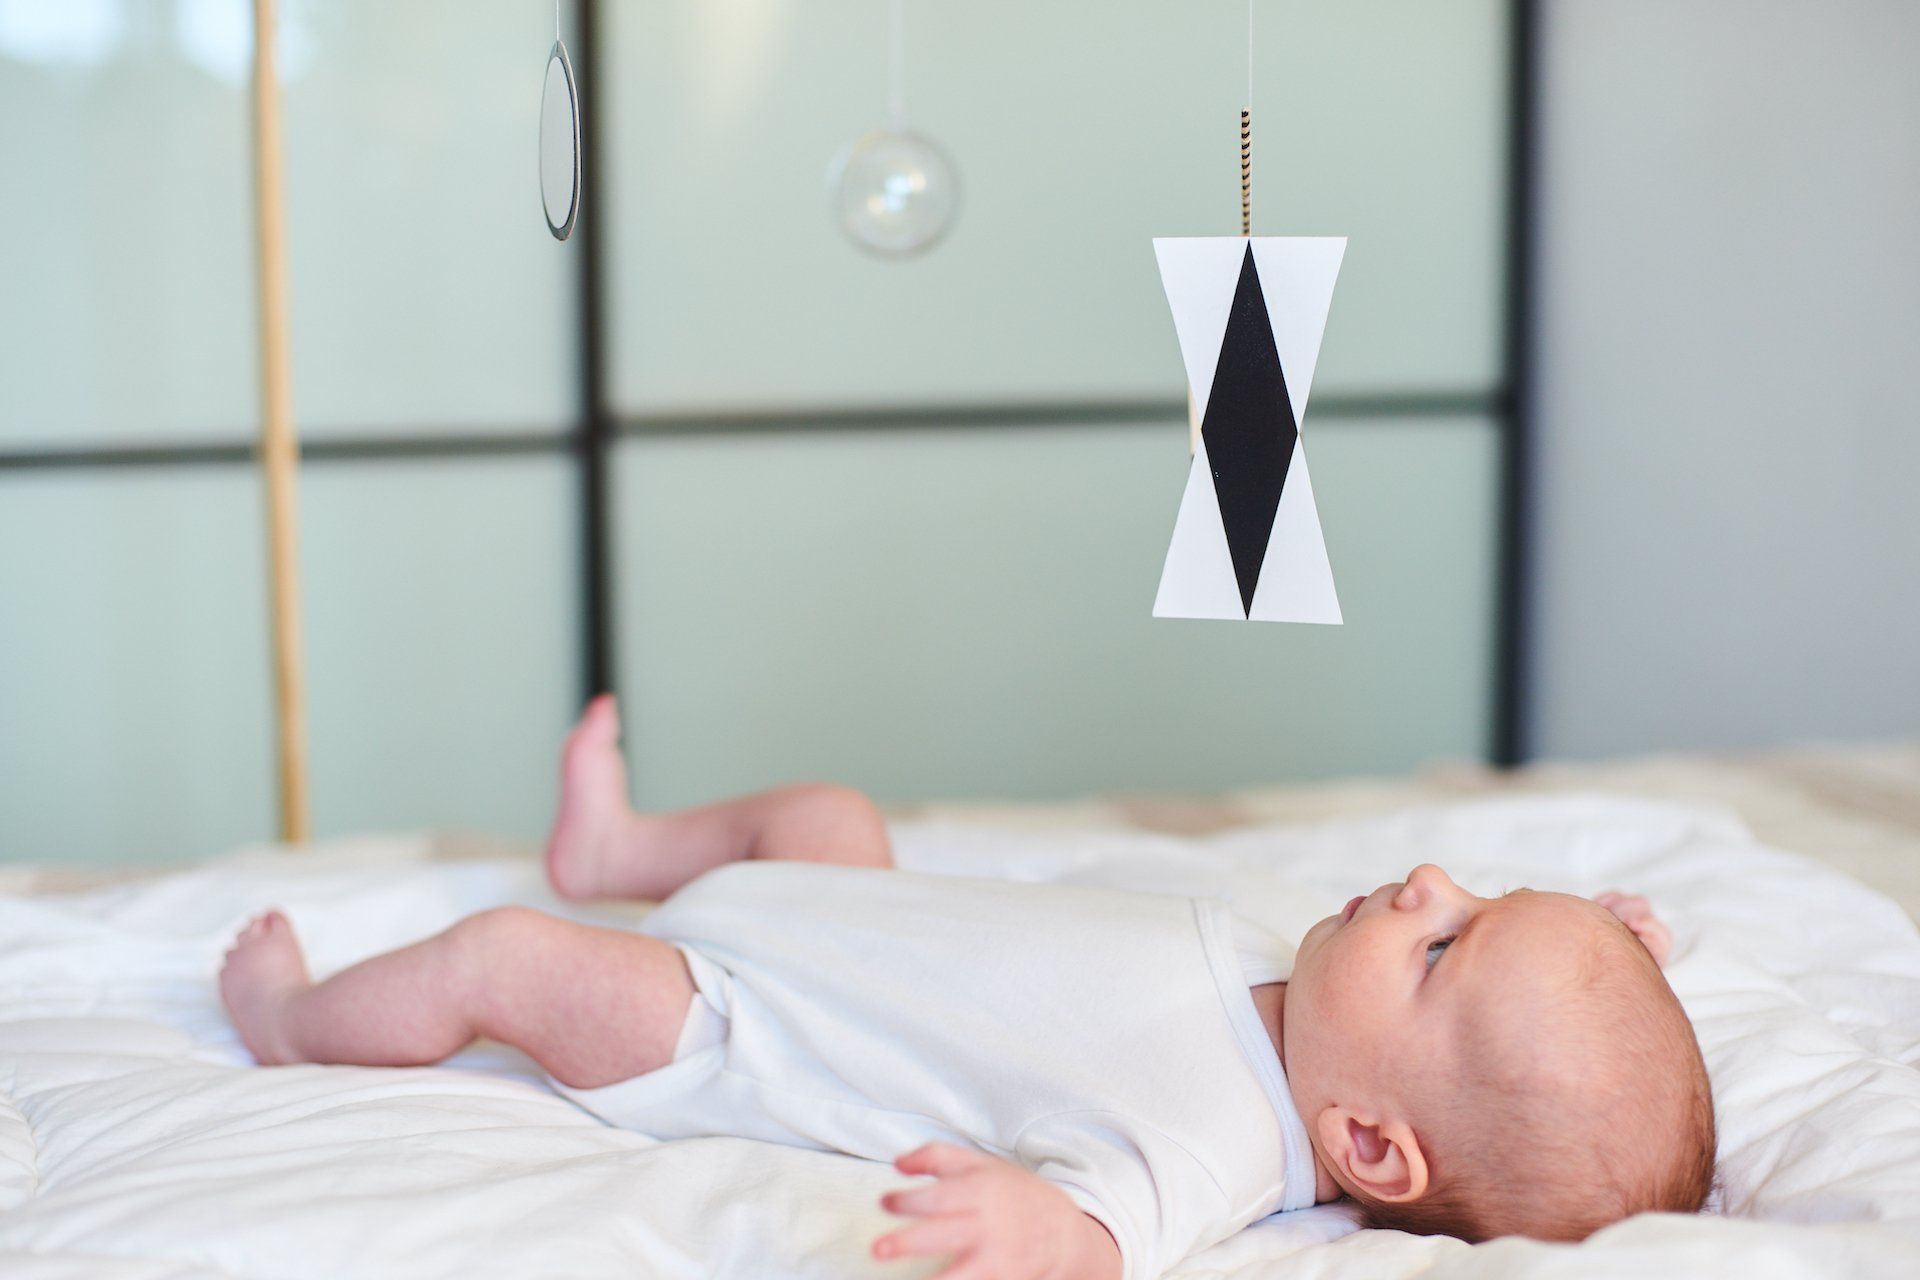
The first mobiles are simple and light enough to allow them to flow with gentle air currents. In order for infants to have the best visual experience, a mobile should be hung so that it is about 12 inches in front of them rather than directly above. When babies are lying on their back, there should be a visual line at about a 45-degree angle from their eyes to the mobile. This particular placement allows infants to see the whole mobile moving.


Each mobile has visual components designed to help infants track the objects and sharpen their vision. Then after these opportunities to follow objects visually, infants begin to have more arm and hand control and might begin to reach and grasp objects nearby. To support this new ability to reach and grasp, the mobiles take a slightly different form and thus need to be easy to grasp, colorful, and safe for children to mouth.


Progression of Mobiles: Visual

The first four mobiles–the Munari, Octahedron, the Gobbi, and the Dancers–provide babies with meaningful visual experiences when they are just recognizing shapes and then later identifying colors.


The Munari

Newborns can only see black and white, so the first mobile we offer does not have any colors and is composed of black and white shapes with contrasting borders and a hanging glass sphere. The hanging glass sphere reflects light and captures infants’ attention. Named after Bruno Munari (1907-1998), an Italian architect who created a series of mobile sculptures that created patterns of light and shadow, the Munari provides newborns the possibility to begin to focus on one object and experience the difference between light and shade.


The Octahedron Mobile

Children start seeing color around two months of age and this mobile introduces primary colors, as well as three-dimensional objects. The traditional mobile has three octahedrons–one red, one yellow, and one blue–made of glossy, reflective paper. Light reflects off the shiny paper and attracts the infants’ attention. Although other simple geometric shapes can be used, it’s best if they have straight lines. When the shapes move, their movements simulate a circle. Although typically introduced around two months of age, the mobile can be used as early as one month of age, because some babies may already be seeing colors and those who aren't may be encouraged to see the new colors.


The Gobbi

We introduce this mobile around one or two months of age, but after the Munari and Octahedron. The Gobbi is made of five spheres hanging from a horizontal rod. The spheres are covered with embroidery floss and have graduation of one color from light to dark and hang in a progression on a 45-degree angle so that the darkest sphere is lowest and the lightest sphere is highest.


The Gobbi was designed by Gianna Gobbi (1920-2002), Dr. Maria Montessori's assistant in the early 1950s. Created specifically for a Montessori environment, the Gobbi helps babies begin to see a gradation of colors and sharpen their visual abilities.


The Dancers

This mobile is made with light, metallic paper of two different colors. The paper is cut into shapes and hung in a way that resembles four dancers. The parts move with the slightest current of air and light plays off the mobile as the dancers spin around.


This mobile moves faster, has parts with two colors, and has shapes that aren’t as definite due to each part within the dancer moving separately. These new visual components help babies with depth perception and focus as they track the different movements of the shapes.


Progression of Mobiles: Tactile

The next four mobiles–Stylized Wooden Figures, Three Colored Spheres, Bell on a Ribbon, and Ring on a Ribbon– represent a shift toward objects that babies can not only track visually, but also reach for, potentially grasp, and also even pull. For that reason, these mobiles need to be attached very securely!


Stylized Wooden Figures

The first of these visual and tactile mobiles is made of light wooden shapes that are ideally realistic figures that could actually fly and move, such as birds, butterflies, or airplanes. If they are painted, the paint should be non-toxic.


In addition to being at an angle for the child to see, this mobile and the subsequent mobiles also need to be hung at a distance where the child can stretch and be able to grasp the items. 


Three Colored Spheres

Made from interlocking circles that form an impression of a sphere when they spin, this mobile is a more tactile version of the Octahedron mobile. Each of the three spheres is a primary color (painted with non-toxic paint, of course), which makes the spheres very contrasting. Because they are made from interlocking wooden disks, the hanging objects also provide babies with four sides that are relatively easy to grasp.


Bell on a Ribbon

The Bell on a Ribbon is a wonderful mobile to use when babies begin to spend more time on their stomachs, or even when they start to be able to sit. Because of this change in the children’s positioning, the mobile height may need to be adjusted.


In the beginning, babies will hit the bell by accident, then they will gradually begin to try reaching for the bell to make the sound again. When babies make contact, the bell moves and they must work harder to grasp it. The bell can also be enclosed inside a crocheted covering.


The ribbon should be attractive enough to see, but not so colorful as to distract attention away from the bell. Although attached securely, the bell should still be large enough to not be a choking hazard.


Finally, for added interest, babies can also be positioned so the bell is at their feet so when they kick it will jingle!


Ring on a Ribbon

This is the last of the mobiles in the Montessori progression and helps babies use more precise movements in order to be able to grasp the moving ring. This simple wooden ring hanging from a ribbon or elastic offers so much benefit as babies reach, grasp, release, and try again. After babies are able to grasp a thick ring, the ring can be switched out for a slightly thinner version. Older babies may also use this material to pull themselves up.


Setting the Scene

In setting up an environment for newborns, one of the key areas is a place for movement. The movement area includes a mat and a hook on the ceiling for hanging the mobiles. It’s ideal for the movement area to have a mirror next to the mat, especially because babies are developing the ability to hold and control their heads. As such, they can look at the mobile in the mirror if they need to have their heads to the side.


Montessori mobiles are meant to be used in a movement area, rather than above a changing area or sleeping area. Interacting with the mobiles is important work for babies and they need prepared space for that work. The area should have natural light and enough airflow to move the mobile, while also being warm enough to be comfortable.


To make it easier to exchange the mobiles, an elastic band or ribbon is attached to the ceiling or off the wall (perhaps with a hanging plant bracket or something comparable). To make it easy to switch out the mobiles, the end of the ribbon or elastic band has a securely attached key ring. The ribbon attached to each mobile also has a ring, so the two rings can be slid together when it’s time to hang the mobile.


Because babies are really engaged when they are focusing on and reaching for mobiles, we want to be sure to allow them to concentrate. Before making a change or interrupting in any way, we take time to observe and wait for when focus shifts and babies show signs of being finished. We start by offering the mobile for short periods of time and then take a break if babies seem to be overstimulated. The best time to use the movement area and the mobiles is when babies are fed and well-rested.


Montessori mobiles offer so many benefits for our babies. During their time with mobiles, infants practice visual tracking, develop their fine and gross motor skills, strengthen their intentional and coordinated movements, and learn how to execute a planned action. Although seemingly simple, these materials for infants are incredibly profound!

Subscribe to our Blog

You might also like

By Danielle Giordano April 6, 2026
Have you ever watched a Montessori teacher give a lesson and thought, "That seemed...very short!”? If so, you may have witnessed a three-period lesson. What looks almost effortlessly simple is actually one of the most carefully designed teaching techniques. The three-period lesson is the primary way we introduce new vocabulary to young children. We use it constantly for phonetic sounds, geometric shapes, textures, quantities, names of parts of a flower, names of continents, and so much more. Virtually every time children learn a precise new word for something they're experiencing with their senses, we are using a version of this lesson. Why Vocabulary Needs Its Own Method Young children are in what Dr. Montessori called a sensitive period for language. This is a window of time when children’s minds are especially primed to absorb new words and refine their understanding of them. It’s important to keep in mind, though, that absorbing a word isn't the same as truly knowing it. Children might hear the word "rough" many times without ever firmly connecting that sound to what their fingers actually feel on a piece of sandpaper. The three-period lesson closes the understanding gap. It's built on an insight Dr. Maria Montessori borrowed from educator Édouard Séguin. Learning a word happens in stages: first association, then recognition, then recall. Moving through those stages deliberately, with no extra words or distractions to clutter the lesson, gives children's minds the clearest possible path to making a lasting connection. “Both object and name should strike the child's understanding at the same time — but only the name itself, and not some other word, should be pronounced.” — Dr. Maria Montessori, The Discovery of the Child The Simplicity of the Three Stages Here's how the three-period lesson unfolds. We’ll use a classic example of teaching the words "rough" and "smooth" with our sensorial textured boards. 1. ASSOCIATION — "This is..." The adult presents the object and names it clearly, with no extra words. The child repeats the word while experiencing the sensation. "This is rough." The child runs their fingers across the surface and repeats: "Rough." 2. RECOGNITION — "Show me..." After a brief pause, the adult asks the child to identify the object by name. The child simply points or touches, and thus no verbal answer is needed. "Which is smooth? Which is rough?" The child points to each in turn. 3. RECALL — "What is this?" The adult points to an object, and the child produces the name themselves, demonstrating that the word is now truly theirs. "What is this?" The child touches the surface and answers: "Rough." The whole lesson might take only two or three minutes, and this brevity is part of what makes it work. A child's attention is fully focused on precise vocabulary acquisition. What Happens When a Child Gets It Wrong One of the most quietly radical aspects of the three-period lesson is what happens when a child gets it wrong. If a child points to the wrong texture in the second stage, the adult doesn't correct. We don’t say, "no, try again.” Instead, we just end the activity gently, with the understanding that we will try the lesson again another day. Dr. Montessori was clear about this approach. A correction at that moment doesn't help a child learn the word. In fact, a correction only reinforces the feeling of having failed. So we simply close the lesson. The child carries no impression of having gotten something wrong, and when we revisit the lesson, the child comes to it fresh. As Dr. Montessori wrote, an error in the second period is simply a sign that the child "was not at that instant ready for the psychic association.” Nothing is wrong with the child. The teaching hasn’t failed. It just wasn’t the right moment. After the Lesson: When Words Come Alive One of the loveliest things to observe after a successful three-period lesson is what children do next. A child who has just learned the words "rough" and "smooth" will often wander the classroom touching things: the edge of a wooden shelf, a piece of fabric, the surface of a stone, and quietly naming the texture to themselves. The words become tools for understanding the world, and they want to use them everywhere. This spontaneous generalization is exactly what the lesson is designed to spark. The goal is never for children to recite vocabulary on command. Rather, we want to give them language that deepens and sharpens their experience of everything around them. Trying It at Home You don't need Montessori materials to use this approach. Any time you want to help a young child connect a precise word to something they're experiencing (the names of spices by smell, the names of fabrics by touch, the names of tools in the garden), the same three-step structure applies. Name it clearly. Ask them to show you. Ask them to tell you. Keep it brief, keep it joyful, and if they get stuck, simply set it aside and try again tomorrow. The lesson works because it respects how young minds learn. New connections need space, simplicity, and the freedom to form without pressure. To see this vocabulary tool in action, schedule a visit here in [Your Location]
By Danielle Giordano March 30, 2026
Rivers are so important to our human story. They are sources of nourishment, transportation, and connection. We see how children are naturally drawn to water, and rivers offer a powerful way to understand ecology, interdependence, and our place within the natural world. With this in mind, we want to share some of our favorite books about water, rivers, and watersheds. Through story and illustration, children can trace the journey of a single drop of water, observe how land and water shape one another, and begin to understand how human choices affect the health of our planet. We’ve grouped the following collection of river and water-focused books by developmental stage. Each title offers language, beauty, and meaningful context for deeper exploration. Whether you are reading with a toddler, a younger elementary child, or an emerging researcher, these books invite wonder, responsibility, and reverence for one of Earth’s most essential elements. For the Youngest Hey, Water! By Antoinette Portis This picture book takes us on a journey of how water is part of our lives in so many ways: from sprinkler spray to a teardrop trickling. The clean-lined illustrations transition between bird’s-eye views and close-up images. This is a great transition book for toddlers moving from pages with one word labeling a picture to a narrative that connects to daily experience. A Place for Rain By Michelle Schaub, Illustrated by Blanca Gómez A lovely introduction to the concept of rain gardens, this picture book follows a simple story of children witnessing how rain runoff can be transformed from being problematic into something stunning and special for everyone. The sweet, slightly geometric illustrations highlight how even simple actions can have a big impact. Water Is Water By Miranda Paul, Illustrated by Jason Chin Although a picture book about the changing states of water, the lyrical text and charming illustrations make this a delightful and fun-filled page-turner! It’s a great way to introduce young children to the water cycle and the importance of water in our lives. Water Cycle: For Younger Elementary Drop: An Adventure through the Water Cycle By Emily Kate Moon Bridging between comic style and traditional picture book, the story follows the character, Drop, as she travels through the water cycle. Delightful and engaging, this is a great book for younger elementary children and can serve as an easy-to-access resource for understanding the states of water. A Drop Around the World By Barbara Shaw McKinney, Illustrated by Michael S. Maydak Written in rhyming verse, this story follows Drop from a cloud near Maine around the world and back to Cape Cod Bay. A map inside the cover shows the journey, and emoji-style images accompany the text, linking to more detailed descriptions of the amazing science at each step along Drop’s path. Watersheds If the Rivers Run Free By Andrea Debunk, Illustrated by Nicole Wong This captivating picture book takes readers through the human story of rivers’ importance in our lives, the mistakes we’ve made, and how we can make things right and help rivers run free again. The rhythm of the text is accentuated by moments of human realization, with bold statements that step out of the rhyming pattern and gently jar us into a sense of action. The illustrations take readers on a journey, too! One Well: The Story of Water on Earth By Rochelle Strauss, Illustrated by Rosemary Woods Through its clear text and lush illustrations, One Well emphasizes the interconnectedness of water on our planet. It offers an array of interesting information that will appeal to children in elementary years, both through narrative text and short snippets overlaid on the images that fill each page. The fact that this picture book has an index is an indicator of how just how much its 32 pages contains! River Story By Meredith Hooper, Illustrated by Bee Willey Rich in realistic content yet engaging and accessible, this lushly illustrated picture book takes readers on a journey from the source of the river to where it empties into the sea. Watersheds: A Practical Handbook for Healthy Water By Gregor Gilpin Beck, Illustrations by Clive Dobson Best for older readers, this book offers helpful and non-technical information about watershed concepts and environmental concerns. This is an excellent resource for older elementary or younger adolescents engaged in ecology research. The illustrations are beautiful, too! We’d love to hear what you think about these books! You can also download a printable list for the next time you visit your local bookstore or library! Also, feel free to schedule a visit here in [Your Town/Location] to learn more about how the story of water flows through children’s lives!
By Danielle Giordano March 23, 2026
For many of us, we remember learning long division as a confusing sequence of steps to memorize and repeat (bring down, divide, multiply, subtract), often without a real sense of why it works. In Montessori classrooms, long division unfolds very differently. Through the Racks and Tubes material, children get to experience what division actually is. Two Ways to Divide: Sharing and Grouping Before introducing the material, we first clarify an important idea: there are two different kinds of division problems in real life. One asks, “If I share this equally, how much does each person get?” This is partitive division, or division by sharing. The other asks, “If I make groups of a certain size, how many groups can I make?” This is measurement division, or division by grouping. The Racks and Tubes material focuses on partitive division. Children physically share quantities equally and discover what one share receives. Materials like the Stamp Game emphasize division of measurement. Together, these approaches give children a complete understanding of division and help them choose the strategy that best fits a given problem. What Are Racks and Tubes? At first glance, the material is impressive and a little mysterious. Children are often drawn to the material, both for its beauty and its seeming complexity. Racks hold test tubes filled with beads, carefully color-coded by place value: units, tens, hundreds, thousands, all the way up to millions. Matching cups hold the dividend (the number being divided). Boards and skittles represent the divisor (the number doing the dividing). Every detail of the material reinforces place value. Each time children need to make an exchange, they trade in one bead of one category for ten of the next category (e.g. one hundred becomes ten 10’s). This process is visible and incredibly concrete. This material takes intentional focus. It takes time. And it makes the steps of long division clear. How Long Division Becomes Concrete When children solve a division problem with Racks and Tubes, they follow a logical, embodied process: They build the dividend using the racks and cups. They represent the divisor with individual figures on boards. They share beads one at a time, equally, to each part of the divisor. They stop when sharing is no longer possible and then see what remains from that category. They then bring down the next category of beads to continue the sharing process. Each step answers a real question: What does one unit get? What happens when we run out? What do we do with what’s left? Instead of being told “bring down the next digit,” children literally bring down the next category of beads. When exchanges are needed, they perform them physically by trading beads. Remainders are not mysterious leftovers. They are beads still sitting in the cup. Long division becomes a story children can follow. From Material to Abstraction One of the most beautiful aspects of this work is how naturally it leads into abstraction. At first, children record only the quotient. Later, they begin recording intermediate remainders. Eventually, they discover that multiplying the quotient by the divisor tells them how much has been used at each step. This is the very heart of the traditional algorithm. We don’t give abstract shortcuts. Instead we help children discover the pattern. This allows them to own the process. By the time children are working abstractly on paper, the algorithm already makes sense. It matches what their hands have done again and again. Why This Matters The Racks and Tubes material does more than teach division. It teaches: Deep place value understanding Logical sequencing Patience and precision Trust in one’s own reasoning Most importantly, it gives children confidence. Division is no longer something done to them. Instead, they can think through the process, step by step, with meaning and understanding. In Montessori, math is not about getting the answer quickly. It’s about building an understanding of why the process and answer makes sense. And with Racks and Tubes, long division finally does! Schedule a visit to our classrooms in Old Saybrook, CT to see for yourself!
More Posts